When you upload your video to YouTube, have you encountered such situation as audio volume is too low and/or lower than your setting?
“Volume / Normalized” feature on YouTube may reduce audio volume at certain conditions.
It’s important for creators (especially for music creators) to optimize audio volume level to be high enough, in order to reserve sufficient signal-to-noise-ratio. Because this impacts to the impression of audience.
This article clarifies how YouTube reacts for the audio volume in your uploaded video, and guide you how to maximize audio volume on YouTube.
What is Max Audio Volume on YouTube?
Max Audio Volume on YouTube
The Wikipedia article “Audio Normalization” tells particular value (i.e. -14 [LUFS]) as reference level about max audio volume on YouTube, while it is not clarified as specifications by YouTube (as official statement) , as far as I searched over internet.
Some people says in their articles, YouTube Audio threshold level is -13 [LUFS].
Then following questions come into my mind.
- Which threshold level is true, (-14 or -13 [LUFS] or something else)?
- What measurement conditions to be used?
- What is sufficient software tools to get accurate enough audio volume (in order to avoid remarkable audio volume reduction by YouTube)?
- how to maximize audio volume on YouTube
So, let’s clear those questions one by one with own test environment.
What is “LUFS” ?
LUFS (Loudness Units relative to Full Scale) is specified by ITU (International Telecommunication Union) as ITU-R BS.1770 standards (Latest “ITU-R BS.1770-5“, Oct. 2015).
LUFS is different from Peak values or RMS (Root Mean Square) values.
LUFS is the loudness units which integrate multichannel loudness during specific time duration (e.g. 400m [sec] gating) with particular weighting filters (with specific frequency responses) to be similar as human loudness perception.
So we need tools for LUFS measurement.
What Software Tools support LUFS?
Following software tools support LUFS (as examples).
- Video Editor, “Davinci Resolve” (audio specific functional block, so called “Fairlight”)
- Audio Editor, “Audacity” (Effect > Loudness Normalization)
- DAW (Digital Audio Workstation) Plugin, “YouLean Loudness Meter2” (VST2, VST3, AU and AAX plugin format)
- Video Editor, “Adobe Premiere Pro“
Note for Good to Know)
- Above software tools are free of charge, except “Adobe Premiere Pro”.
I evaluated the LUFS meter in video editor, “Davinci Resolve”, compared with “Volume/Normalized” data on YouTube, as I described in next chapter.
YouTube Audio Normalization Behavior based on Measured Data
Behavior of “Volume/Normalized” feature on YouTube is clarified as following according to the comparison data between “YouTube” and “Davinci Resolve”, since I uploaded several music videos (to YouTube) which have different max audio volume.
Observed Behavior about YouTube Audio Normalization
Following is my observation of “Volume/Normalized” behavior on YouTube, according to the LUFS measured data (refer “LUFS Measured & Calculated Data Table” from next chapter) which I got from my video uploading experience.
- Absolute Max Audio Volume Level on YouTube: -14 [LUFS]
- Notes) -13 [LUFS] at certain conditions => Further study is needed for clarification.
- If audio volume of uploaded video would be higher than -14 [LUFS],
- YouTube will reduce max audio volume level to be -14 [LUFS]
- If audio volume of uploaded video would be lower than -14 [LUFS],
- YouTube will NOT adjust audio volume.
Audio Data (Comparison Between “YouTube” and “Davinci Resolve”)

Audio volume data is obtained from each video at both “YouTube” and “Davinci Resolve” as following.
How to Get “Volume/Normalized” Data at YouTube
You can get “Volume/Normalized” values on YouTube from PC during target video browsing. You will find “Stats for Nerds” from the menu by clicking mouse on the YouTube screen, and click it. Then you will get “Volume/Normalized” as below.

Above figure (as an example) says “Volume / Normalized 100% / 93% (content loudness 0.6dB)”.
What mean by each values in “Volume / Normalized” on YouTube? Those 3 values mean following.
- “Volume 100%”:
- YouTube set volume 100% output ( I always see 100%).
- “Normalized 93%”:
- YouTube reduced audio volume -0.6 [dB] (= 20 x log10 (93%) ).
- “Contents Loudness 0.6 [dB]”:
- Audio volume level of uploaded video is 0.6 [dB], before normalization on YouTube.
- => No explanation about reference audio volume to be treated as 0 [dB].
- Audio volume level of uploaded video is 0.6 [dB], before normalization on YouTube.
How to get “Loudness” [LUFS] on Davinci Resolve
Click “Fairlight” (audio functional block name in Davinvci Resolve) , after you boot up your target video project (having audio) on Davinci Resolve.
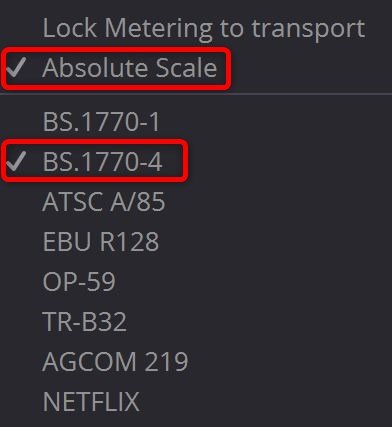
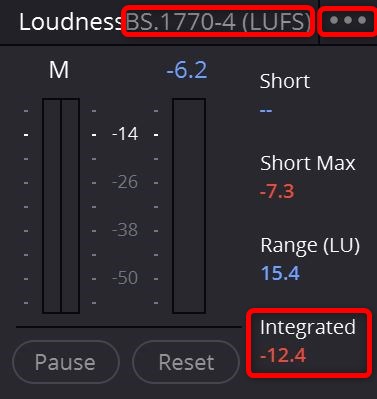
- Click the icon […] (Red Circle 1) on the right-up corner, then select target LUFS standards (i.e. “BS.1770-4“), and check “Absolute Scale” (refer Red Rectangles on the below figure).
- Enable “automation” by clicking target icon illustrated in below figure (Red Circle 2).
- Then you will find bus (or master) output track. You will find “Loudness history” as illustrated in below figure (Red Circle 3), when low side border of bus track is stretched by mouse operation. Click toggle button of “Loudness History” to be enabled.
- Sound start from the beginning of video by clicking the “Start” icon in the below figure (Red Circle 4).
- Monitor the values at “Integrated” (Red Circle 5).
- Read the values at “Integrated” (Red Circle 5) by clicking the “Stop” icon in the below figure (Red Circle 6) at the end of video.
- You can see “Loudness History” as a graph, when you stop the video sound by clicking the “Stop” icon in the below figure (Red Circle 6) at the end of video.


![Loudness [LUFS] Measurement Procedure on Fairlight, Davinci Resolve](https://dan-chan.com/wp-content/uploads/2021/12/LUFS_Meas_Davinci_Resolve-01-800x378.jpg)
Evaluation Procedure
- Adjust/check max audio volume (LUFS) of your video with trustable audio level meters (e.g. Loudness meter on Davinci Resolve), before you upload your video to YouTube.
- Verify/check “Volume/Normalized” values of your video with “Stats for Nerds” on YouTube, after you uploaded your video to YouTube.
- Check correlation of “Volume / Normalized” values on YouTube and your LUFS values on your measurement tools and minimize gaps, if you would observe the unacceptable difference between 1 and 2 described in above.
Verification
I have done this study preliminary, when I uploaded “Video7” to YouTube and recognized that audio volume of “Video1” and “Video2” is getting lower than my setting (as expectation).
Then I started to adjust audio volume from “Video8” before uploading to YouTube.
As you see from “LUFS Measured & Calculated Data Table”, I could manage content loudness at YouTube (e.g. -0.3 [dB] at “Video8”, -0.2 [dB] at “Video9”, -0.1[dB] at “Video10” ) for the thanks of this study and accurate enough LUFS measurement on “Davinci Resolve”.
How to Maximize Audio Volume on YouTube
In order to maximize audio volume on YouTube, following 3 matters are taking into accounts.
- Use of Accurate Enough Loudness Meter
- Correlation between YouTube and Used Tools (Loudness Meter)
- Uncertainty of Threshold Level at YouTube
Use of Accurate Enough Loudness Meter
First of all, it’s essential to utilize the tools with accurate enough loudness meter which has sufficient correlation with YouTube results.
According to my verification experience, I would say that video editing software, “Davinci Resolve” is good enough measurement accuracy to maintain the measurement error less than +/-0.5 [dB], since “LUFS Measured & Calculated Data Table” indicates such smaller errors as 0, 0.1 and 0.2 [dB].
Correlation between YouTube and DaVinci Resolve
When I adjusted audio volume level to be -14 [LUFS] at “Video9”, YouTube results indicates content loudness -0.2 [dB]. This means, LUFS values on Davinci Resolve tend to be 0.2 [dB] lower than that of YouTube. (Same trend is observed from 5 video samples among 10 video samples).
Uncertainty of Threshold Level at YouTube
I observed the possibility of YouTube threshold level -13 [LUFS] at certain conditions, while -14 [LUFS] has higher probability.
Assuming following 2 cases at both YouTube Threshold level: -14 [LUFS] and/or -13 [LUFS], Case1) condition has advantage to realize higher audio volume on YouTube after normalization.
- Case1) 0.5 [dB] higher than YouTube threshold level => YouTube reduce 0.5 [dB].
- => -14.0 [LUFS] in case of YouTube Threshold level, -14 [LUFS]
- => -13.0 [LUFS] in case of YouTube Threshold level, -13 [LUFS]
- Case2) 0.5 [dB] lower than YouTube threshold level. => YouTube will NOT reduce at all.
- => -14.5 [LUFS] in case of YouTube Threshold level, -14 [LUFS]
- => -13.5 [LUFS] in case of YouTube Threshold level, -13 [LUFS]
Recommendation
Taking above 3 matters into accounts, it would be good idea to adjust audio volume (in your video) to be -13.5 [LUFS] on Davinci Resolve specifically, in order to maximize audio volume on YouTube.
I hope that this article will be helpful for you to control audio volume on YouTube by getting better understanding of “Volume / Normalized” feature.


